
How-to
Maytag Wringer Washer Agitator Removal
How should I prepare to remove a Maytag wringer washer agitator?
Identify the washer family, disconnect power or secure the engine, drain the tub, and follow the manual. Photograph the center assembly and do not force a stuck agitator by prying between the agitator and tub bottom; inspect related seals, clips, bushings, and shaft splines while it is apart.
An agitator may need to come out for center-plate, water-seal, or transmission work. It is not a universal procedure: older and newer Maytag wringer washer assemblies can differ, and forcing a corroded or stuck agitator can damage the shaft, spline, or center plate.
Before you start
Unplug an electric machine or stop and secure an engine. Drain the tub, and have a clean place to keep washers, clips, and fasteners in removal order.
Inspect before force
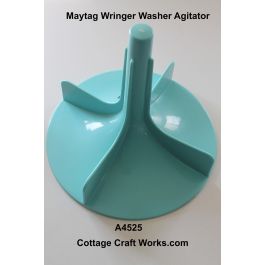
Attempt to pull up on the agitator. If the agitator has been routinely removed and cleaned underneath, it should come off rather easily. Over the years, not routinely removing it will corrode the spline to the shaft from detergent build-up. This will necessitate manually pulling it. Cottage Craft Works does have an agitator puller, but for one-time use, these tools can be expensive. Do not pry against a porcelain tub or strike the center shaft. You can rig up a homemade agitator puller as pictured in this feed or rig up a system using ratchet straps for securing truckloads and a jack sitting on a 2 x 4 across the machine top. There is a good chance that the old plastic agitators will crack or break in this process, but there is really no other option to get to the center assembly bolts and the tub seal. Cottage Craft Works has replacement agitators.
With the agitator removed.
If you are successful with removing the agitator, inspect the agitator spline for wear. Chances are you will need to replace it with a new one from Cottage Craft Works. It will come with a smooth rubber outside and will need to be machine pressed in to comform to the agitator splines. The spline shaft serves as a clutch with the rubber between the agitator metal part and the shaft.
Cottage Craft Works notes that replacement rubber splines require a bearing press; aluminum, red, or some black agitators with a round hole and no splines may not accept a new rubber spline. The hole is smaller, making it almost impossible to press in a new rubber spline without cracking the old agitator. It will be best to order a new agitator with your spline to save a lot of trouble.
Removing the old spline from the agitator can be accomplished by twisting in a long lag screw sized to screw into the aluminum housing, then holding the hex head in a vise while trying to pull it off by hand while working it side to side. If this fails to yield results, you will need to resort to mechanical removal by either drilling or cutting through the metal spline part and then pulling out pieces until it is all removed. Again, if it is an aluminum, red, or some black agitators with a round hole and no splines, chances are slim that you will be able to press in a new spline, so save yourself the trouble and go with a new agitator.
After removing the agitator, find the old spline is stuck on the shaft; the best option is to use a Dremel tool with a cutting blade to carefully cut along the side, not into the agitator shaft, and then use a screwdriver to pry it open to remove. Wire brush the shaft to clean it for the new spline and install a new stop ring. The ring keeps the agitator from floating up.
Plan the repair as an assembly
If removal exposes a worn water seal, stop ring, clip, bushing, or center shaft, record every part number before ordering. A complete center plate assembly can be the more sensible repair when several wear parts are due, while a single confirmed failure may need only its matching component.
Clean away buildup in the bottom of the tub and inspect around the center plate. If the agitator was corroded on the shaft, chances are the tub also has corrosion, developing into pinholes. In a dark room, use a light from underneath and in the tub to spot potential pinholes. Cottage Craft Works has a tub repair ring that can be inserted over the holes and sealed with gasket sealer and the tub bolts during reassembly.
Safety First
Removing anything like this using mechanical means under pressure always carries risk from sudden, unexpected releases or from flying debris. Agitators are old and brittle. Safety glasses and staying clear while under pressure are always important. Release pressure while attempting to have hands in the tub to lubricate or adjust the mechanism being used.
What you need
- Model and serial information
- Model-matched service manual
- Basic hand tools
- Camera or phone for reference photos
- Parts tray and clean rags
Photos

Homemade Agitator Puller
Downloads
- Open link
Maytag center assembly and agitator parts
Use photos and part notes to compare a documented assembly.
- Open link
Shop Maytag wringer washer parts
Catalog category for Maytag parts and assemblies.
- Open link
Replacement Agitator
- Open link
Agitator Puller Tool
- Download
Agitator Removal From Manual
- Download
Maytag Center Shaft Maintenance
- Open link
Tub Repair Ring