
Article
Rebuilding Your Heller-Aller PHB Brass Cylinder Force Pump
How do I rebuild a Heller-Aller PHB Brass Cylinder Force Pump?
Rebuilding the PHB involves inspecting the castings and brass cylinder, replacing worn leather components, servicing valves and packing, reassembling the pump, and testing it before returning it to service.
The Heller-Aller PHB Brass Cylinder Force Pump was designed to be serviced and rebuilt as its internal leather seals and other wear components age. Many PHB pumps that become difficult to prime, lose pumping capacity, leak internally, or have been out of service for years can be restored by inspecting the brass cylinder and valve components and replacing worn leathers and gaskets.
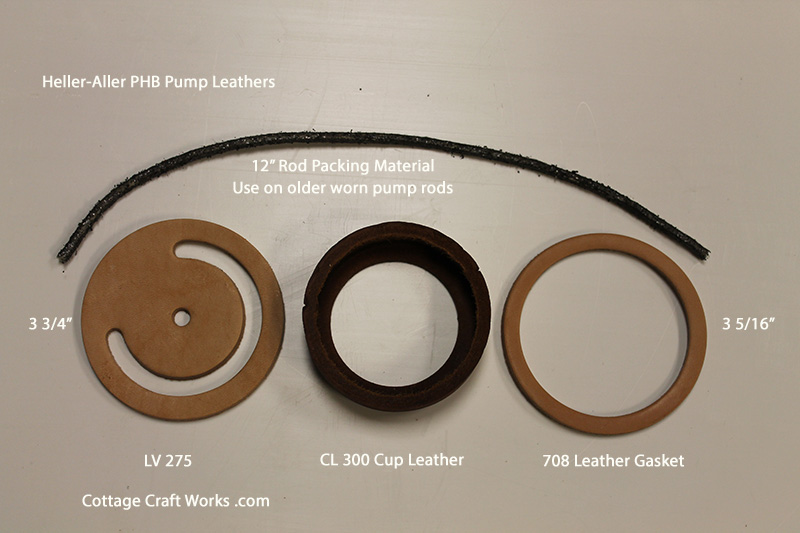
This guide covers the complete rebuilding process, including disassembly, inspection of the B-9 brass cylinder, servicing the plunger and valve components, replacing the CL 300 cup leather, LV 275 valve leather, and 708 leather gasket, inspecting the force-pump components, reassembly, priming, testing, and adjustment.
Rebuilding Your Heller-Aller PHB Brass Cylinder Force Pump
One of the most valuable features of the Heller-Aller PHB is that it was designed around serviceable mechanical components rather than a sealed, disposable pumping assembly.
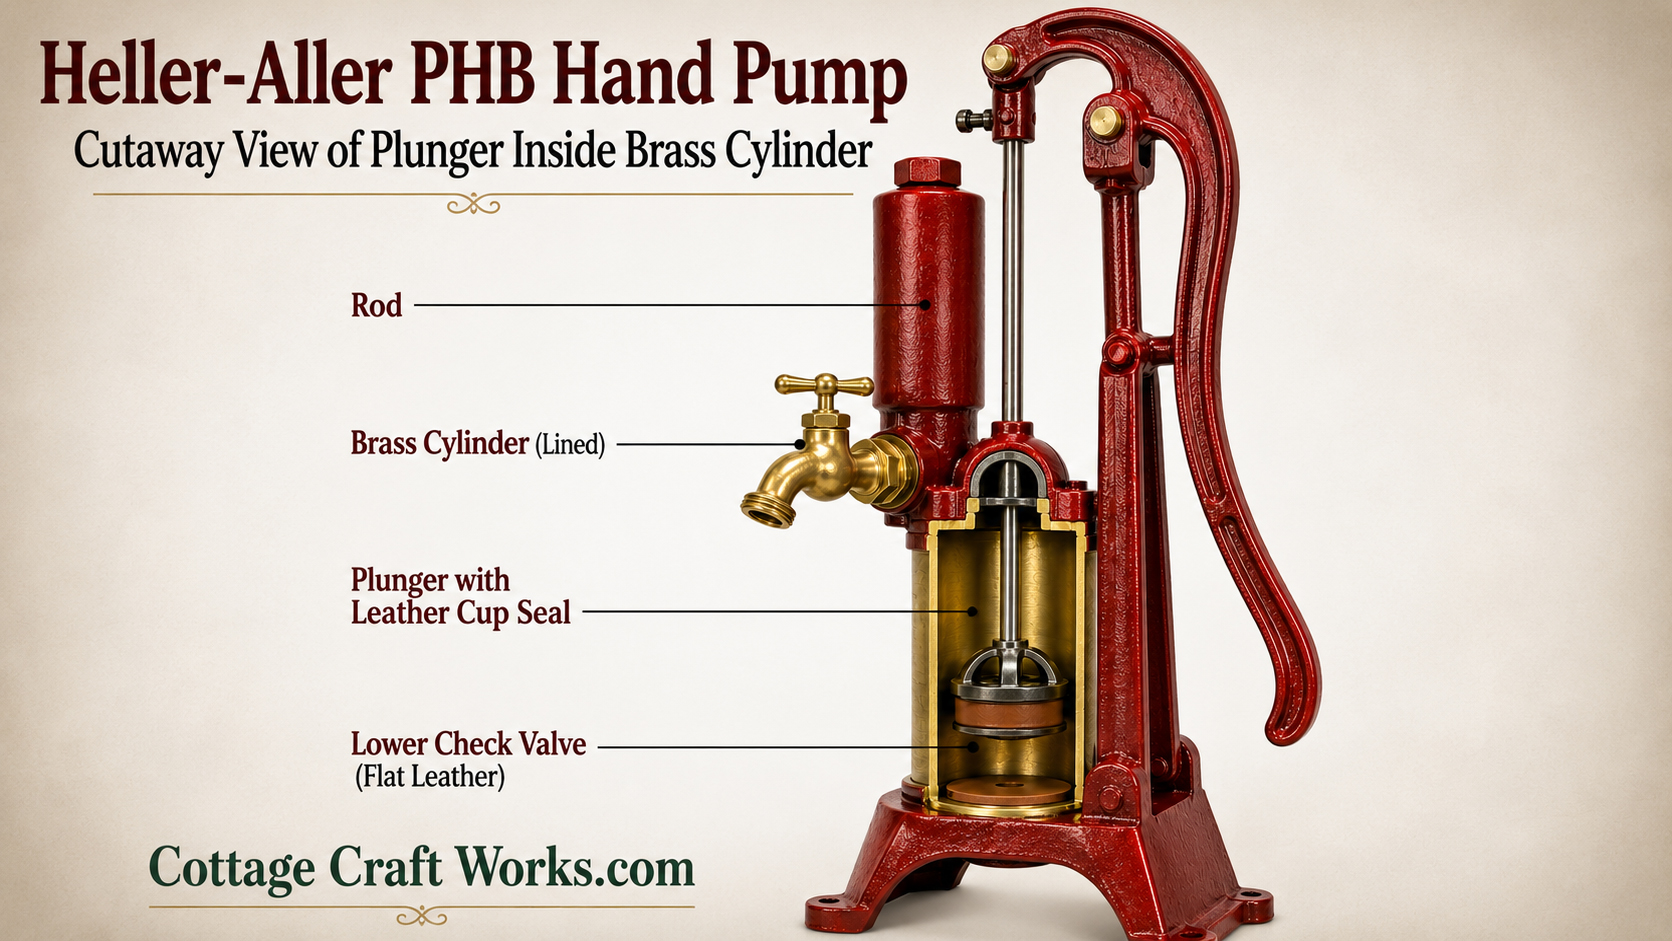
At the heart of the PHB is the B-9 brass cylinder. Inside the cylinder, a leather-sealed plunger moves as the handle is operated. The plunger and valve arrangement control the movement of water through the cylinder. Unlike the simpler Fig. T cistern pump, the PHB also incorporates a force-pump discharge and air chamber, allowing water to be delivered under pressure through the hose bibb.
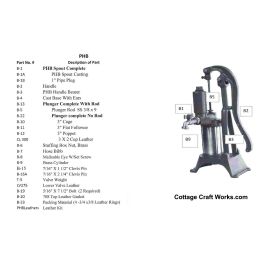
The surviving Heller-Aller PHB factory parts literature identifies the major service components, including the B-9 Brass Cylinder, B-10 3-inch Cage, B-11 3-inch Follower, B-12 3-inch Poppet, T-6 Plunger Complete with Rod, T-5 Valve Weight, B-17 LV 275 Leather, B-18 CL 300 Leather, and B-20 708 Leather Gasket.
Because these components can be inspected and replaced individually, a worn PHB often does not require replacement of the entire pump.
When Should a PHB Pump Be Rebuilt?
Consider rebuilding the PHB when the pump:
Becomes difficult or impossible to prime.
Requires excessive handle strokes before producing water.
Produces noticeably less water than it once did.
Loses its prime unexpectedly.
Has very little pumping resistance.
Pumps water from the spout but no longer develops satisfactory pressure through the hose bibb.
Has dried, cracked, hardened, distorted, or damaged leather components.
Leaks around the brass-cylinder joints.
Has been stored dry or unused for an extended period.
Has been disassembled for restoration and the condition of its internal wear components is unknown.
Before rebuilding the pump, make sure the problem is actually inside the PHB.
A leaking suction pipe, loose fitting, excessive suction lift, low water level, or obstruction can produce symptoms very similar to worn pump leathers. Installing new internal parts will not correct an air leak between the pump and water source.
Before Disassembling the PHB
Take several photographs of the complete pump before beginning and additional photographs as each assembly is taken apart.
This is particularly useful with older Heller-Aller pumps. A PHB may have been repaired several times during decades of service, and the pump you are rebuilding may contain a combination of original and replacement components.
Clean dirt, rust flakes, mineral deposits, and other contamination from the exterior before opening the pump.
If the PHB supplies drinking water, keep internal components, replacement parts, tools, and the work area clean throughout the rebuilding process.
Step 1 — Remove the Pump From Service
Disconnect the pump from the water supply or otherwise place the system in a condition where the PHB can be safely serviced.
If the pump is mounted at a sink or counter, determine whether the repair can conveniently be performed in place or whether removing the complete pump will provide better access.
Protect the open 1¼-inch suction/supply pipe so tools, hardware, dirt, or pieces of old leather cannot fall into it.
Step 2 — Inspect the Handle and External Linkage
Before opening the pump, operate the handle and inspect the external mechanism.
Check the:
B-2 Handle
B-3 Handle Bearer
B-5 Plunger Rod
Clevis pins
Pivot points
B-8 Malleable Eye with Set Screw
Connections between the handle and plunger rod
These are identified as individual components in the original PHB parts information.
Look for excessive movement, worn holes, loose pins, bent components, or a loose connection to the plunger rod.
Lost motion in the linkage reduces the actual distance the plunger travels inside the cylinder. A pump can therefore have good internal leathers and still perform poorly if excessive handle movement is being lost through worn linkage.
Correct obvious linkage problems as part of the rebuild.
Step 3 — Inspect the PHB Force-Pump Components
The PHB differs from the Fig. T because it is not simply a pitcher-style suction pump. The PHB incorporates a force-pump discharge and air chamber and can deliver water through its B-7 hose bibb.
Before concentrating entirely on the brass cylinder, inspect the upper pump body and discharge components.
Check for:
Cracks or damage in the casting.
Leakage around threaded fittings.
Condition of the hose bibb.
Mineral or sediment buildup.
Obstructions in the discharge path.
Loose or damaged connections.
Evidence of leakage around the plunger rod or stuffing-box area.
A PHB that lifts water normally but performs poorly when delivering through the hose bibb may have a problem in the force-pump/discharge portion rather than the primary cylinder leathers.
Step 4 — Inspect the Stuffing Box and Plunger Rod
The original PHB parts list identifies a B-6 Brass Stuffing Box Nut and B-5 Plunger Rod.
The original stuffing box used a length of graphite rope wrapped around the stem, and the nut tightened to form the seal while allowing the stem to move up and down. Newer PHB pumps have a one-piece gasket for the B-23. If you are working on an older pump, you will want to continue ordering the old pump packing, as the pump rod stem is probably worn enough to not seal with a new-style B-23 gasket.
Inspect the rod where it passes through the upper pump assembly.
Look for:
Excessive corrosion.
Deep wear.
Bending.
Rough areas.
Leakage around the rod.
Binding during operation.
The stuffing-box area must permit the rod to move while controlling leakage. It should not be tightened simply to the point that the rod becomes difficult to operate.
If the rod is badly damaged where it passes through the sealing area, correcting the sealing material alone may not stop leakage.
Step 5 — Open the Brass Cylinder Assembly
Carefully disassemble the pump sufficiently to expose the B-9 brass cylinder and internal plunger assembly.
The surviving factory parts list identifies two B-19 5/16-inch × 8-inch bolts in the PHB assembly.
Loosen the cylinder hardware gradually and evenly.
Do not place unnecessary twisting or prying force on the old castings. Pumps that have been assembled for many years may be held together by mineral deposits, corrosion, dried gasket material, or paint.
If components are stuck, work them apart patiently rather than using enough force to crack a casting.
Organize all hardware as it is removed.
Step 6 — Remove the Plunger Assembly
Carefully withdraw the plunger and rod assembly from the brass cylinder.
Avoid allowing threaded parts, tools, or sharp edges to scrape the inside of the cylinder.
Before disassembling the plunger, photograph it and note the orientation of the:
Cage
Follower
Poppet
Cup leather
Rod
Retaining components
The PHB factory literature identifies the complete unit as the T-6 Plunger Complete with Rod, while the major individual plunger components are identified as the B-10 Cage, B-11 Follower, and B-12 Poppet.
Maintaining the correct relationship among these components is essential when rebuilding the plunger.
Step 7 — Inspect the B-9 Brass Cylinder
The B-9 brass cylinder provides the working surface against which the cup leather seals.
The PHB reference material identifies the cylinder as approximately 3 inches I.D. × 6 inches.
Clean the inside of the cylinder and inspect it carefully for:
Mineral deposits
Sand or sediment
Heavy scoring
Longitudinal grooves
Corrosion or pitting
Dents
Out-of-round areas
Sharp edges
Damage at the cylinder ends
Normal discoloration or polishing from years of use does not automatically mean the cylinder needs replacement.
The important consideration is whether the cylinder still provides a smooth and reasonably uniform sealing surface for the cup leather.
Do not aggressively grind or remove significant brass simply to improve its appearance. Excessive material removal can increase cylinder diameter and make it more difficult for the leather to maintain an effective seal.
Step 8 — Inspect the Existing CL 300 Cup Leather
The B-18 CL 300 cup leather creates the moving seal between the plunger and the inside wall of the brass cylinder. It is one of the most important wear components in the PHB. The original Heller-Aller PHB parts list specifically identifies the CL 300 leather.
Inspect the old leather before discarding it.
Replace it if it is:
Hard or brittle.
Cracked.
Torn.
Badly worn.
Permanently distorted.
Shrunken.
Missing portions of its sealing edge.
No longer capable of expanding against the cylinder wall.
A dry leather may sometimes regain flexibility when thoroughly wetted, but a badly deteriorated leather should be replaced rather than depended upon for reliable service.
Step 9 — Disassemble the Plunger and Replace the CL 300 Cup Leather
Carefully disassemble the plunger sufficiently to remove the old cup leather.
Inspect the B-10 cage, B-11 follower, B-12 poppet, threads, and mating surfaces while the assembly is apart. These are all separately identified service components in Heller-Aller's original PHB parts literature.
Clean away old leather fragments, sediment, mineral deposits, and corrosion that could interfere with operation.
Install the replacement CL 300 cup leather in the same functional orientation as the original assembly.
Cottage Craft Works' PHB parts information specifies that the follower must be removed from the cage assembly to replace the cup leather. The assembly can be inverted, and the cage carefully held while a large wrench is applied to the flat sides of the follower. The cage should not be crushed or overtightened in the vise because the casting can crack. If the cage is rusted on, hold it in one hand with the stem and the follower up. Tap the bottom of the follower with a hammer to knock it loose. Do not place the stem on a solid surface or place it in a vice to hold it while tapping it, as this will break the cage. Holding it in one hand provides enough bounce for the shock to radiate to the other hand.
Preparing the New Cup Leather
New leather may initially be stiff and should not be forced dry into the brass cylinder.
Soften the leather with clean water until it becomes pliable enough to install without damaging its sealing edge.
For a PHB used for drinking water, do not use automotive grease, petroleum oil, or an unidentified lubricant on the leather or other wetted components.
If additional lubrication is required, use only a lubricant specifically suitable for potable-water equipment and compatible with leather.
Step 10 — Reassemble and Inspect the Plunger
Reassemble the cage, cup leather, follower, poppet, and associated hardware in their proper working relationship.
Make sure the leather is centered and evenly supported.
The leather must be secure, but the assembly should not be tightened in a manner that unnecessarily crushes or permanently distorts it.
Once assembled, inspect the cup around its entire circumference.
A folded or uneven edge can prevent the pump from sealing correctly and can damage a brand-new leather as soon as the plunger is inserted into the cylinder.
Step 11 — Inspect and Replace the LV 275 Valve Leather
The original PHB parts list identifies the B-17 LV 275 Leather as another service component.
Unlike the cup leather, the LV 275 is a flat valve leather used as part of the pump's one-way valve system.
Inspect the old valve leather for:
Cracks.
Hardening.
Curling.
Tears.
Distortion.
Mineral buildup.
Damage around its openings.
Inability to lie correctly against its sealing surface.
Replace a damaged or hardened valve leather.
Before installing the replacement, clean the valve seating surfaces carefully. Even a small piece of old leather, mineral scale, sand, or rust can prevent the valve from closing properly.
A new valve leather cannot seal against a dirty or damaged valve seat.
Step 12 — Inspect the Valve Weight, Poppet and Follower
Leather replacement should always be accompanied by inspection of the metal components that control and support the valve action.
The original PHB parts list identifies the:
T-5 Valve Weight B-11 3" Follower B-12 3" Poppet
as individual components.
Inspect these parts for:
Corrosion.
Mineral deposits.
Distortion.
Excessive wear.
Broken edges.
Restricted movement.
Damage that prevents proper seating.
Clean reusable components before reassembly.
The valves must be able to open when water is supposed to move through the cylinder and close when pressure reverses. If they cannot seat correctly, water can leak backward between strokes and the pump may be difficult to prime or may deliver very little water.
Step 13 — Inspect and Replace the 708 Leather Gasket
The original PHB parts list identifies the B-20 708 Leather Gasket.
Whenever the brass-cylinder assembly is opened for a complete rebuild, inspect this gasket carefully.
Replace it if it is:
Brittle.
Torn.
Cracked.
Permanently compressed.
Distorted.
Damaged during disassembly.
No longer capable of forming a dependable seal.
Clean the gasket-contact surfaces before installing the replacement.
Do not attempt to stop a leak caused by a damaged gasket simply by overtightening the cylinder hardware. Excessive tightening can damage the casting without correcting the underlying sealing problem.
Step 14 — Clean the Cylinder Before Final Assembly
Before reinstalling the rebuilt plunger, clean the B-9 brass cylinder one final time.
There should be no:
Sand.
Loose mineral scale.
Metal particles.
Pieces of old leather.
Cleaning residue.
Sharp debris.
Wet the new cup leather with clean water.
Carefully start the plunger into the cylinder, guiding the edge of the cup leather inward.
Do not simply force the plunger into the opening. A cup leather that folds backward, rolls over, or is cut against the cylinder edge may fail immediately.
Step 15 — Reinstall the Plunger Assembly
Slide the rebuilt plunger into the brass cylinder carefully.
Some resistance is expected. The cup leather must press against the cylinder wall or it cannot create an effective pumping seal.
However, the plunger should not require extreme force.
If the assembly binds badly, stop and determine why. Check for:
Folded leather.
Incorrect assembly.
Misalignment.
Debris.
Cylinder damage.
A bent plunger rod.
Forcing a binding plunger can destroy a new cup leather.
Step 16 — Reassemble the Brass Cylinder and Pump Body
Reassemble the PHB in the reverse order of disassembly.
Make sure the:
Brass cylinder is properly seated.
708 gasket is correctly positioned.
Plunger rod is centered.
Upper and lower castings are aligned.
Long cylinder bolts are correctly positioned.
Handle and linkage move freely.
Tighten the cylinder hardware gradually and evenly from side to side.
The objective is to compress the gasket uniformly and hold the assembly securely—not to apply maximum possible torque.
Remember that many PHB pumps have old cast-iron components. Excessive tightening can crack a casting that might otherwise have remained serviceable for decades.
Step 17 — Reconnect the Handle and Adjust the Linkage
Reconnect the plunger rod to the handle mechanism and inspect the complete operating movement.
Slowly move the handle through its full stroke.
Watch and feel for:
Binding.
Excessive side movement.
Loose clevis pins.
Lost motion.
Rod misalignment.
Excessive resistance.
Contact between moving parts and the casting.
The handle should transfer its movement smoothly to the plunger.
Correct obvious linkage problems before attempting to pump water.
Step 18 — Check the Stuffing Box
Once the plunger rod is correctly aligned, inspect the B-6 stuffing-box area again.
The rod must be able to reciprocate without excessive leakage, but the stuffing box should not be tightened so aggressively that it creates unnecessary friction or makes the pump difficult to operate.
After the pump is primed, this area should be checked again under actual operating conditions.
Step 19 — Prime the Rebuilt PHB
A completely drained or newly rebuilt PHB must normally be primed before it can lift water.
The surviving Heller-Aller PHB instructions specify removing the prime plug on top of the spout casting and pouring water into the cylinder while operating the pump. When the cylinder is full and water begins coming from the spout, the pump is primed. The prime plug is then replaced.
New leather may initially require additional water and several pumping strokes before it becomes completely wetted and conforms to the cylinder.
Do not immediately assume the rebuild has failed if a dry new leather takes a short period to establish its seal.
Step 20 — Test Normal Spout Operation
Once primed, operate the pump through several complete strokes.
Check for:
Smooth handle movement.
Normal pumping resistance.
Consistent water delivery.
Leakage around the brass cylinder.
Leakage at the 708 gasket.
Leakage around the plunger rod.
Unusual mechanical noises.
Binding.
Loss of prime.
A properly rebuilt PHB should develop a noticeable pumping load as the plunger moves water.
Very little resistance can indicate that the plunger or a valve is not sealing—or that the pump is drawing air through the suction line.
Step 21 — Test the PHB Force-Pump Function
This is an important additional step for the PHB.
The PHB's force-pump arrangement allows water to be discharged through the B-7 hose bibb, rather than functioning only as an open-spout pitcher pump. The original PHB component reference identifies both the hose bibb and the force-pump/air-chamber function.
After confirming normal water delivery, test the force-pump discharge.
Check for:
Water delivery through the hose bibb.
Leakage around threaded fittings.
Leakage around the upper pump assembly.
Proper handle resistance.
A noticeable difference between normal open discharge and pumping against a restricted or elevated discharge.
If the pump lifts water normally but does not perform correctly as a force pump, investigate the upper discharge and air-chamber components rather than automatically reopening the brass cylinder.
Step 22 — Check Whether the Pump Holds Its Prime
After testing, allow the PHB to sit unused.
The original Heller-Aller instructions state that the pump should remain primed when the handle is left in the down position during normal, non-freezing use.
If the pump repeatedly loses prime, investigate:
Suction-line air leaks.
Loose threaded connections.
Valve seating.
Debris beneath the valve.
Damaged valve leather.
Gasket leakage.
Water level changes.
Repeatedly replacing plunger leather will not correct a suction-line leak or a valve that allows water to drain backward.
If the Rebuilt PHB Still Will Not Pump
If the PHB has been correctly rebuilt but still will not lift or deliver water, work through the complete system before disassembling the pump again.
Check:
Suction-line air leaks
Loose pipe fittings
Water level beyond practical suction capability
Inadequate priming
Incorrectly installed or damaged CL 300 cup leather
LV 275 valve leather not seating correctly
Debris beneath a valve
Worn or damaged poppet, follower, or valve weight
Damaged 708 gasket
Excessive handle/linkage wear
Bent or binding plunger rod
Deeply scored or damaged brass cylinder
Stuffing-box problems
Obstruction in the discharge passage
Problems within the PHB force-pump/air-chamber assembly
The PHB depends on the entire system working together. A perfectly rebuilt brass cylinder cannot compensate for an air leak in the suction pipe.
New Leather Break-In and Adjustment
New leather components may behave differently after they have been fully saturated with water and operated for some time.
After the initial rebuild:
Operate the pump through a number of full strokes.
Allow the leather to remain wet.
Recheck handle movement.
Inspect the cylinder joints for leakage.
Inspect the stuffing-box area.
Recheck accessible hardware.
Confirm that the pump continues to hold prime.
Do not make unnecessary adjustments simply because a new cup leather initially feels tighter than the worn leather it replaced.
The objective is a good seal with smooth mechanical movement.
Long-Term Care of PHB Pump Leathers
Leather pump components generally perform best when they are periodically used and allowed to remain conditioned by water.
When a PHB remains unused for a long period, its leather may dry and shrink. The pump may then require additional priming before the leather swells sufficiently to establish a dependable seal again.
Avoid introducing petroleum oils, automotive grease, or unapproved chemicals into a PHB used for potable water.
Periodic inspection of the handle, linkage, rod, cylinder joints, hose bibb, and visible hardware can also identify small problems before they develop into larger repairs.
Freeze Protection After Rebuilding
The original Heller-Aller PHB instructions provide a simple procedure for draining the pump where freezing is possible.
After use, raise the pump handle completely and hold it up for approximately 10 seconds. According to Heller-Aller's instructions, this opens the lower valve, allowing water to drain from the pump and supply line. The pump may need to be primed again before its next use.
The installation must actually permit the supply line to drain. Low points or plumbing arrangements that trap water can still freeze even when the pump is in the drain position.
Sanitizing the PHB After Rebuilding
If the PHB supplies drinking water, the pump and associated water system should be properly sanitized before being returned to potable water service.
Use the appropriate well or cistern disinfection procedure and operate the pump until the disinfected water has passed through the cylinder, valves, force-pump passages, spout, and connected discharge plumbing.
After the required contact time, thoroughly flush the system with clean potable water before drinking.
Cottage Craft Works Note: The amount of chlorine required depends upon the type and volume of the water system. Do not use a single fixed bleach quantity for every well or cistern installation.
Rebuild Rather Than Replace
A worn cup leather or valve does not necessarily mean an old PHB has reached the end of its useful life.
The original Heller-Aller design uses individually identifiable and serviceable components, including the brass cylinder, plunger, cage, follower, poppet, valve weight, leathers, gasket, rod, linkage, stuffing-box components, and discharge fittings.
That serviceable construction is one reason these pumps can remain useful long after many newer water pumps would simply be replaced.
A careful rebuild should therefore address the entire pumping system, not just install new leather. Inspect the cylinder, plunger, valves, linkage, stuffing box, gaskets, suction system, and PHB force-pump components; correct the actual source of the problem; then properly prime and test the pump before returning it to service.
Disclaimer: This troubleshooting guide is provided for general informational and educational purposes. Pump installations, well conditions, plumbing systems, and individual Heller-Aller PHB pumps may vary. Always shut down and depressurize connected systems before servicing the pump, follow applicable plumbing and well regulations, and consult a qualified professional when necessary. Cottage Craft Works assumes no responsibility for damage, injury, water contamination, or system failure resulting from improper installation, diagnosis, repair, or use.
Photos
PHB Leather Kit 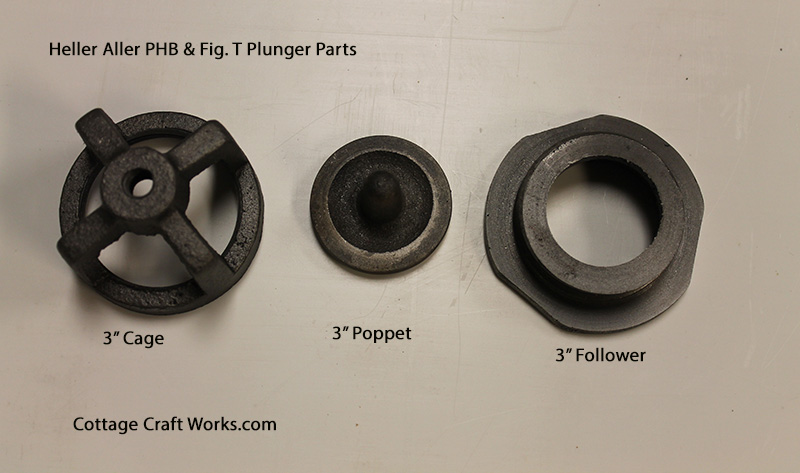
PHB Plunger Parts 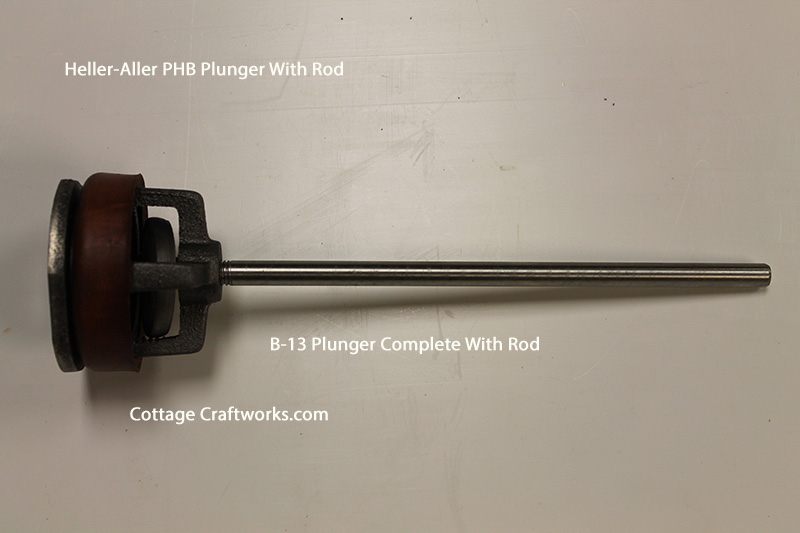
PHB Complete Plunger 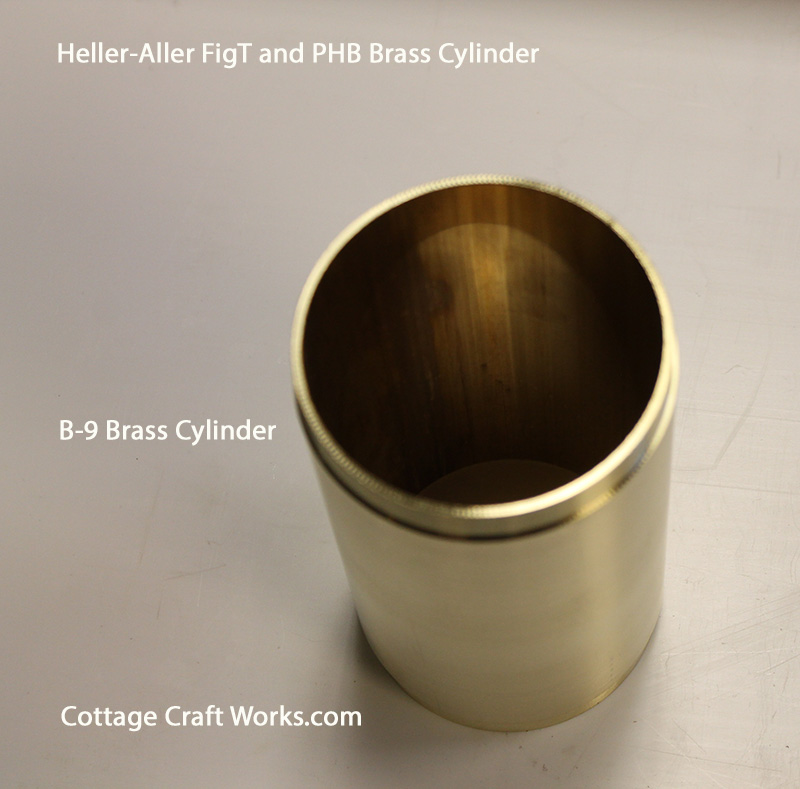
PHB Replacement Brass Cylinder 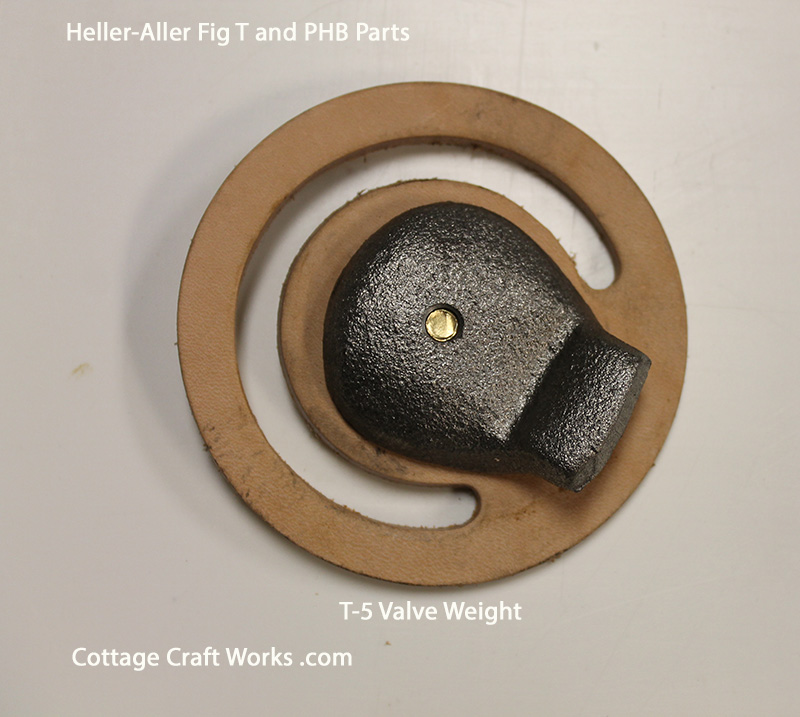
PHB Valve Leather and Weight
Downloads
Frequently Asked Questions
How often should I rebuild my PHB?
Can I reuse old leathers?
Do I need special tools?
Should every part be replaced during a rebuild?
Is rebuilding better than replacing the pump?
Where can I purchase genuine replacement parts?
Why Buy from Cottage Craft Works?
We proudly offer:
• Genuine Heller-Aller pumps and replacement parts
• Expert product knowledge
• Installation assistance
• Troubleshooting guidance
• Rebuilding resources
• Historical information
• Fast shipping
• Friendly customer service
Whether you're installing a new pump, restoring a family heirloom, or rebuilding a pump that has served for generations, Cottage Craft Works is committed to helping you keep your Heller-Aller water pump operating for decades to come.