
Article
Rebuilding the Heller-Aller Model 190-A Brass Lift Cylinder
How do you rebuild a Heller-Aller Model 190-A brass lift cylinder?
Safely pull the supported pipe-and-rod assembly, disassemble the cylinder in recorded order, inspect the brass bore, plunger, rod, seats, leathers, and valves, install correctly matched replacement parts in their original direction, reassemble without binding, bench-check valve action, reinstall, adjust the stroke, sanitize, and test.
A practical rebuilding guide for the 2½-inch × 10-inch brass lift cylinder supplied with the Heller-Aller Model 190-A pump.
When a 190-A becomes difficult to prime, loses water between strokes, produces less water, or requires many strokes before discharge, the fault may be in the submerged cylinder. Worn or hardened cup leather, a leaking valve, mineral deposits, sand scoring, a damaged rod connection, or air leakage at a pipe joint can produce similar symptoms. Diagnose the complete system before assuming the cylinder alone is at fault.
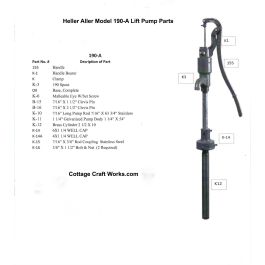
The Model 190-A uses a serviceable brass lift cylinder. Rebuilding normally centers on the plunger cup leather and the cylinder’s valve components, but the exact parts must be matched to the cylinder currently installed. Pumps from other manufacturers may look similar, and old systems may have been altered. Confirm the Heller-Aller identification and measure the existing parts before ordering replacements.
Before Pulling the Cylinder
Check the pump-head linkage, handle pin, rod connection, and visible pipe joints.
Note whether the pump loses prime while idle, pumps air, binds, or simply delivers less water.
Confirm that falling water levels or seasonal drawdown have not uncovered the cylinder.
Obtain the correct Heller-Aller 190-A cylinder parts before opening the well.
Prepare safe lifting and pipe-holding equipment for the full installed depth.
Photograph or mark the orientation and order of cylinder parts during disassembly.
SAFETY NOTE: Pulling the cylinder requires lifting the full pipe, rod, and cylinder assembly in controlled sections. If a joint slips, equipment can fall into the well or cause serious injury. Use qualified well-service help whenever the assembly cannot be positively supported and controlled.
Cylinder Removal and Disassembly
1. Take the pump out of service. Prevent use, clean the work area, and remove the pump-head linkage only after the pipe is positively supported.
2. Pull controlled sections. Raise only enough assembly to secure the next coupling. Support the pipe at the casing, disconnect rod sections without bending them, and then remove pipe sections. Keep a count and preserve their order.
3. Protect the cylinder. Lift the brass cylinder clear without striking the casing. Cap or cover the well opening and move the cylinder to a clean bench.
4. Clean the exterior. Wash away soil and deposits before opening the cylinder so debris cannot enter during service.
5. Open the cylinder. Use properly fitting tools on the end fittings or retaining parts. Support the brass barrel so it is not crushed, twisted, or deeply marred. Do not clamp thin brass directly in aggressive vise jaws.
6. Remove the plunger assembly. Withdraw the rod and plunger carefully. Record which direction the cup leather faces and the order of washers, nuts, cages, spacers, and valve parts.
7. Remove serviceable valve parts. Disassemble the inlet/check-valve components only as required for inspection and replacement. Keep old parts for comparison until the rebuilt cylinder passes testing.
Inspection
Brass barrel: inspect for scoring, dents, cracks, corrosion, scale, and a ridge in the working area.
Cup leather: replace if hard, cracked, torn, stretched, misshapen, or unable to contact the barrel evenly.
Valve leather or sealing element: replace if curled, stiff, cut, eroded, or unable to lie flat on its seat.
Valve seats: clean and inspect for grit, pitting, grooves, or damage that prevents sealing.
Plunger and cage: inspect for cracks, distortion, loose hardware, blocked passages, and sharp edges that could cut new leather.
Rod and couplings: inspect threads, straightness, security, and signs of rubbing or fatigue.
End fittings and pipe threads: inspect for cracks, cross-threading, corrosion, and sealing damage.
Installing New Leathers and Valves
1. Match the parts. Compare every replacement with the removed part, including diameter, center opening, thickness, valve shape, and hardware order.
2. Condition leather parts. If the supplied instructions call for conditioning, soften new pump leather in clean potable water or another manufacturer-approved medium. Do not use petroleum grease or an unapproved lubricant in a drinking-water system.
3. Install the cup leather. Place the cup in the same direction as the original so pressure expands its lip against the brass barrel on the pumping stroke. The lip must be even, undamaged, and free to enter the barrel without folding.
4. Install the valve. Place the flat or shaped valve component in its original orientation. It must move freely and seat completely without being pinched by the cage, washer, or fastener.
5. Tighten plunger hardware. Secure the plunger stack so it cannot loosen, while leaving moving valve parts free. Avoid overtightening that crushes leather, distorts the cage, or strips threads.
6. Clean and reassemble. Remove loose scale without aggressively enlarging or scratching the bore. Rinse all potable-water components, guide the new cup into the cylinder, and reinstall end fittings with appropriate seals.
Bench Checks Before Reinstallation
Move the rod through its travel; resistance should be smooth and even.
Confirm that the plunger does not catch, fold the leather, or strike an end fitting.
Add clean water and check that the valves admit water in the correct direction and hold it against reverse flow.
Verify that rod and pipe connections remain centered and secure.
Do not force a tight assembly; reopen it and correct the cause.
Reinstallation and Testing
Reinstall the cylinder using Resource 1 and the general deep-well installation guide. Adjust the rod at the pump head so the plunger uses its working stroke without bottoming. Prime slowly, check delivery and holding ability, then disinfect and flush the system before potable use.
Troubleshooting After Rebuilding
No water after priming: Check cylinder orientation, water level, foot valve, air leaks, disconnected rod, and incorrectly installed valve parts.
Pumps but quickly loses prime: Inspect the lower valve, foot valve, pipe joints, and valve-seat cleanliness.
Very hard handle movement: Check for a folded or oversized cup, mineral deposits, a bent rod, misalignment, or plunger bottoming.
Low or intermittent delivery: Check cylinder submergence, worn or reversed cup leather, valve leakage, pipe leakage, and restricted inlet or tailpipe.
Knocking or scraping: Stop operation and inspect rod centering, couplings, stroke adjustment, and cylinder hardware.
Source Notes
Model-specific specifications are based on the Cottage Craft Works Heller-Aller Model 190-A product and replacement-parts listings. General installation and sanitation practices should be used together with the existing Cottage Craft Works deep-well hand-pump installation resources and the current instructions supplied with the pump and cylinder.
Safety & Responsibility Disclaimer
This guide is provided for general educational and planning purposes only. It does not replace the current Heller-Aller instructions, applicable well-construction and plumbing codes, local health-department requirements, or the judgment of a qualified well professional. Conditions vary by well depth, casing, water level, equipment, and site.
Deep-well pump installation involves heavy suspended pipe, pump rods, and equipment that can fall, shift, or cause serious injury, property damage, contamination, or loss of components down the well. Use properly rated lifting and pipe-holding equipment, maintain control of the assembly at all times, and hire a qualified well contractor whenever the load, working height, equipment, well condition, or procedure is beyond your training or ability. Cottage Craft Works LLC assumes no responsibility for injury, damage, contamination, equipment loss, or system failure resulting from installation, service, use, or misuse of the pump or this information. Disinfect and test the water system as required before placing it into drinking-water service.
Useful links
- Open link
Heller-Aller 190-A Pump Parts