
Article
Identifying an Original Heller-Aller Fig. T Pump & Parts Identification
How can I identify an original Heller-Aller Fig. T pump and its parts?
An original Heller-Aller Fig. T can be identified by examining manufacturer markings, its brass-cylinder construction, handle and linkage arrangement, spout, mounting configuration, dimensions, and internal pumping components. Important parts to identify include the pump body or cylinder, handle, linkage, pump rod, spout, plunger assembly, plunger leather, plunger cage, check valve, and connecting hardware. Because older pumps may have been repaired or modified, use the entire pump's construction and measurements rather than relying on paint color or one individual component.

The Heller-Aller Fig. T is a traditional brass-cylinder hand pump designed primarily for cistern and shallow-well applications. Because many of these pumps have remained in service for decades, identifying the exact pump and its components is an important first step before attempting repairs or ordering replacement parts.
This guide explains how to recognize an original Heller-Aller Fig. T, identify its principal external and internal components, and determine what information to collect before beginning a repair or rebuild.
Long Description
Identifying an Original Heller-Aller Fig. T Pump
Heller-Aller has a long history of manufacturing hand-operated water pumps, and many older pumps remain installed on farms, homesteads, cabins, and cistern systems. After years of use, repainting, repairs, and replacement components, manufacturer markings may become difficult to read.
That can make identifying an old pump more complicated than simply looking for a model number.
The Fig. T is generally recognized as a compact brass-cylinder cistern or shallow-well pump rather than the larger deep-well force-pump designs.
Before ordering parts, examine the complete pump rather than relying on a single component.
Look for Heller-Aller Identification
Inspect the pump carefully for:
- Heller-Aller name or casting marks
- Model or figure identification
- Numbers or markings cast or stamped into components
- Original brass or bronze components
- Handle and linkage configuration
- Spout configuration
- Mounting arrangement
- Cylinder dimensions
- Rod and plunger construction
Old paint, corrosion, mineral deposits, or previous repairs may obscure markings. Cleaning the area carefully may reveal information that was not initially visible.
Do Not Identify the Pump by Color Alone
Paint is not a dependable way to identify an old hand pump.
During its lifetime, a pump may have been stripped, repainted, or refinished several times. Replacement parts may also be a different color or finish from the original pump.
Instead, use the pump's construction, dimensions, castings, handle arrangement, cylinder, spout, and internal components to help establish its identity.
Fig. T External Parts Identification
Before disassembling the pump, become familiar with the components visible from the outside.
Depending on the age and configuration of the pump, these generally include:
Pump Body or Cylinder
The main cylindrical portion of the pump contains and supports the internal pumping mechanism.
Pump Handle
The hand-operated lever provides the mechanical movement required to operate the plunger.
Handle Linkage and Pivot Hardware
These components transfer movement from the handle to the pump rod.
Pump Rod
The rod connects the handle mechanism with the internal plunger assembly.
Spout
Water discharged by the pump exits through the spout.
Mounting Hardware
Bolts and mounting points secure the pump to the counter, platform, cistern cover, or other supporting surface.
Lower Pipe Connection
The lower portion of the pump connects to the water-supply piping or suction arrangement.
Fig. T Internal Parts Identification
Understanding the internal components becomes especially important when rebuilding an older Fig. T.
Plunger Assembly
The plunger moves inside the pump cylinder as the handle is operated. Its movement creates the pumping action that draws water into the cylinder and moves it toward the discharge spout.
Plunger Leather
Leather components create the seal needed between the moving plunger and the cylinder wall.
Old pump leather may become:
- Hard
- Dry
- Cracked
- Misshapen
- Worn
- Unable to seal against the cylinder
A pump can appear mechanically complete yet fail to pump properly because the leather no longer produces an adequate seal.
Plunger Cage
The cage associated with the plunger assembly helps retain and support components of the pumping mechanism. Its position and construction are useful when determining how an older pump was assembled and which replacement components may be required.
Check Valve
The check valve allows water to move in the intended direction while helping prevent it from flowing backward between strokes.
On the Fig. T assembly, the valve should not be confused with the plunger leather or cage. Correct identification of these pieces is important when diagnosing a pump that will not prime or hold water.
Rod and Connecting Hardware
The rod transmits the handle's movement to the internal pumping assembly. Inspect the rod, pins, connections, and related hardware for excessive wear, bending, corrosion, or previous modifications.
Identifying Parts on an Older or Previously Repaired Pump
Not every Fig. T still contains every component it left the factory with.
Over decades of service, owners may have:
- Replaced worn hardware
- Fabricated unavailable pieces
- Installed different fasteners
- Replaced leather seals
- Modified pipe connections
- Repainted the pump
- Mixed old and newer replacement components
For that reason, one unusual component does not necessarily mean the pump is not a Heller-Aller Fig. T.
Look at the pump as an entire assembly.
Measure Before Ordering Replacement Parts
Do not assume that a replacement part will fit simply because an old pump resembles a Fig. T.
Before ordering parts, record the important dimensions of the existing pump and components.
Useful information includes:
- Cylinder diameter
- Overall dimensions
- Rod dimensions
- Plunger dimensions
- Leather diameter
- Valve dimensions
- Mounting-hole spacing
- Pipe connection size
- Handle and linkage measurements
Photographs can also be extremely helpful.
Take pictures of the entire pump before disassembly, followed by clear photographs of each component as it is removed.
Photograph the Pump During Disassembly
A simple photographic record can prevent considerable confusion when it is time to put the pump back together.
Photograph:
- Complete assembled pump
- Handle and linkage
- Pump rod connection
- Spout
- Mounting arrangement
- Plunger assembly
- Plunger cage
- Leather components
- Check valve
- Washers and hardware
- Order and orientation of internal parts
Place small parts in the order they were removed.
This is particularly useful when working on a pump that may have been repaired or modified previously.
Original Parts vs. Replacement Parts
A replacement component need not look identical to a century-old component to perform the same function.
Manufacturing processes, materials, and minor component designs can change while the basic operating principle remains the same.
The important considerations are correct application, dimensions, fit, sealing, and function.
Cottage Craft Works supplies replacement and repair parts for Heller-Aller pumps and can use model information, measurements, and photographs to help determine the appropriate components for an existing pump.
When Identification Is Uncertain
If you cannot positively identify the pump, avoid ordering solely from appearance.
Gather:
- Clear pictures of the complete pump.
- Pictures of any names, numbers, or casting marks.
- Pictures of the internal parts.
- Cylinder and plunger measurements.
- Pipe connection measurements.
- Mounting dimensions.
This information provides a much better basis for identifying an older pump and selecting appropriate repair components.
There is a no-label pump that has surfaced that looks just like the PHB, and all the parts for the 3" cylinder fit it. The Fig T pump is a cousin of the PHB and also uses the same-size leathers. The pump rod does not have the top packing, and it has a round loop to hook to the handle. It is suspected that Heller Aller may have made plain-label pumps that were sold through companies like Sears and Montgomery Ward, which were very active in providing products for farm and rural living in their early years. They may have also made a Fig T plain-label pump as well.
Why Proper Identification Comes Before Rebuilding
Correct identification prevents a common mistake with vintage hand pumps: taking the pump apart first and trying to identify everything afterward.
Identify and photograph the pump while it is still assembled whenever possible.
Once you know that you have a Heller-Aller Fig. T and understand the major components, you can move on to troubleshooting, rebuilding, leather replacement, valve service, and installation with much greater confidence.
Disclaimer
This information is provided for general educational purposes. Always follow the manufacturer's instructions and observe appropriate safety practices for pump and piping installations.
Photos
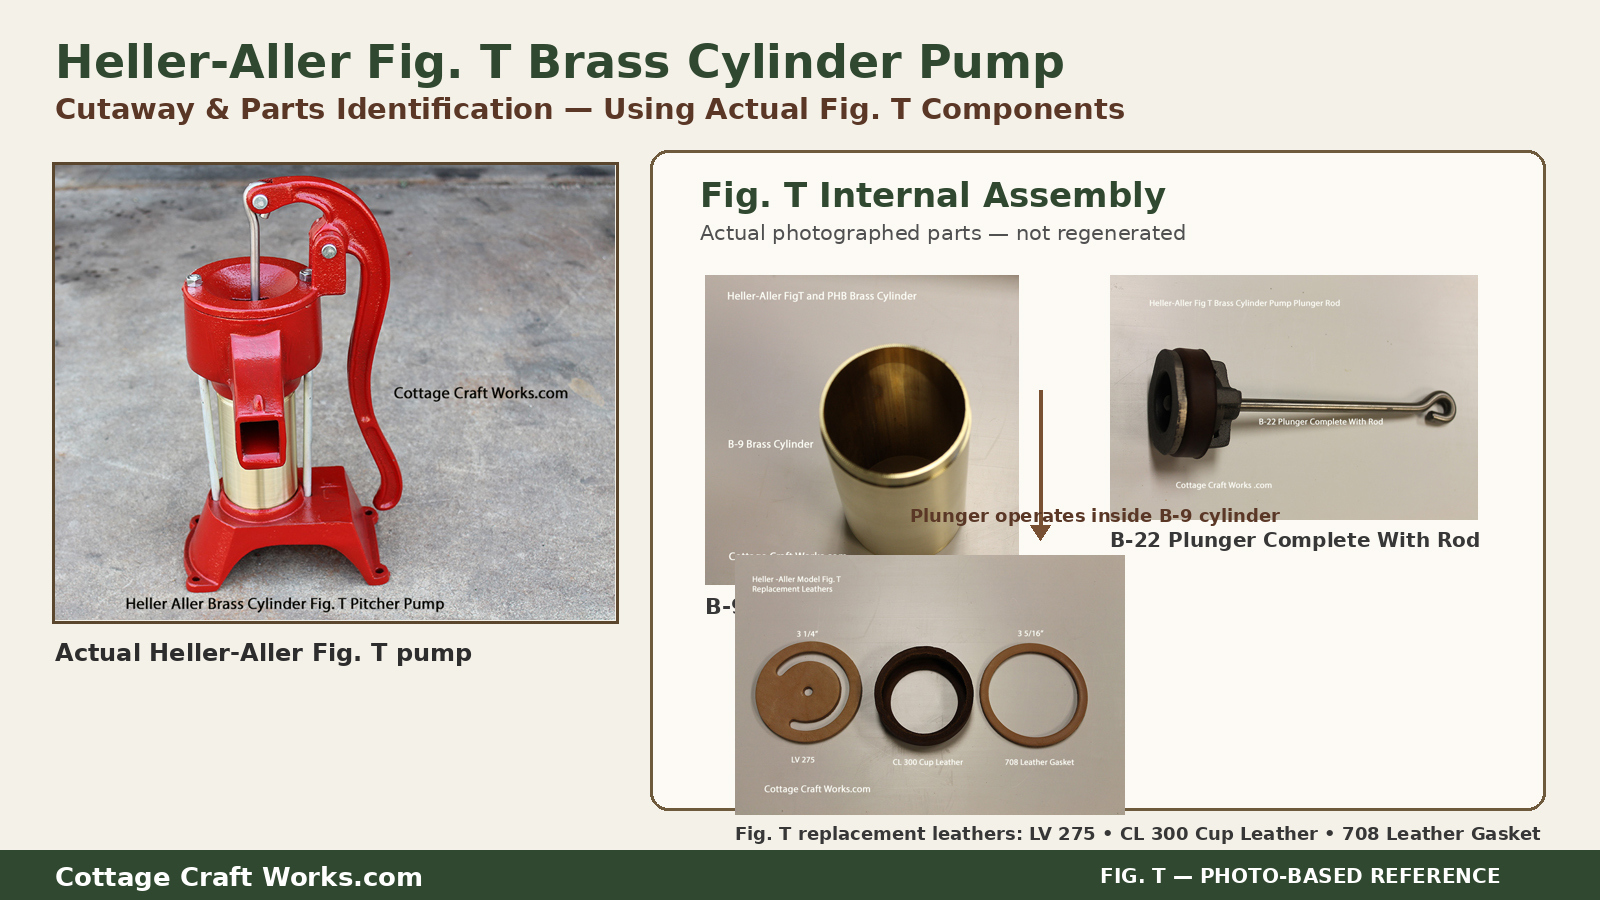
Heller Aller Fig T Part Pictures 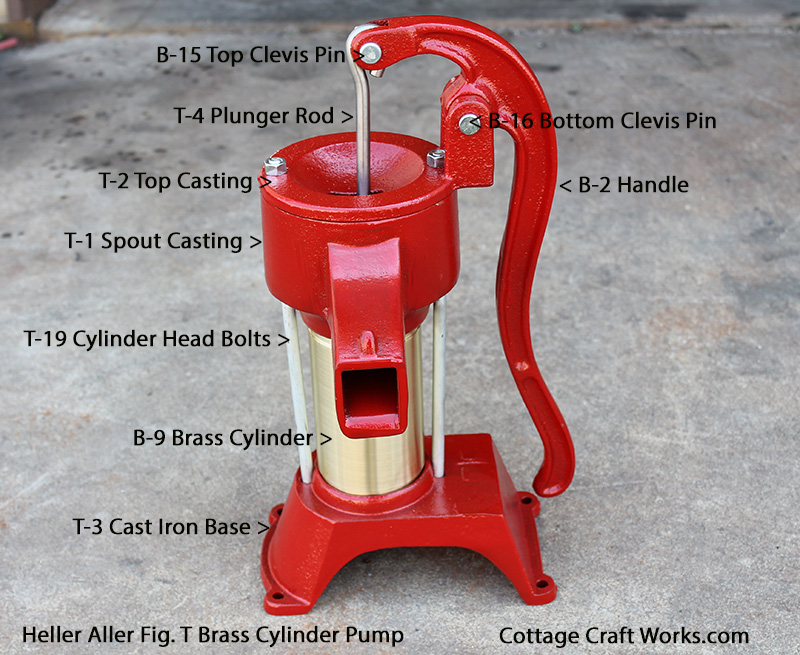
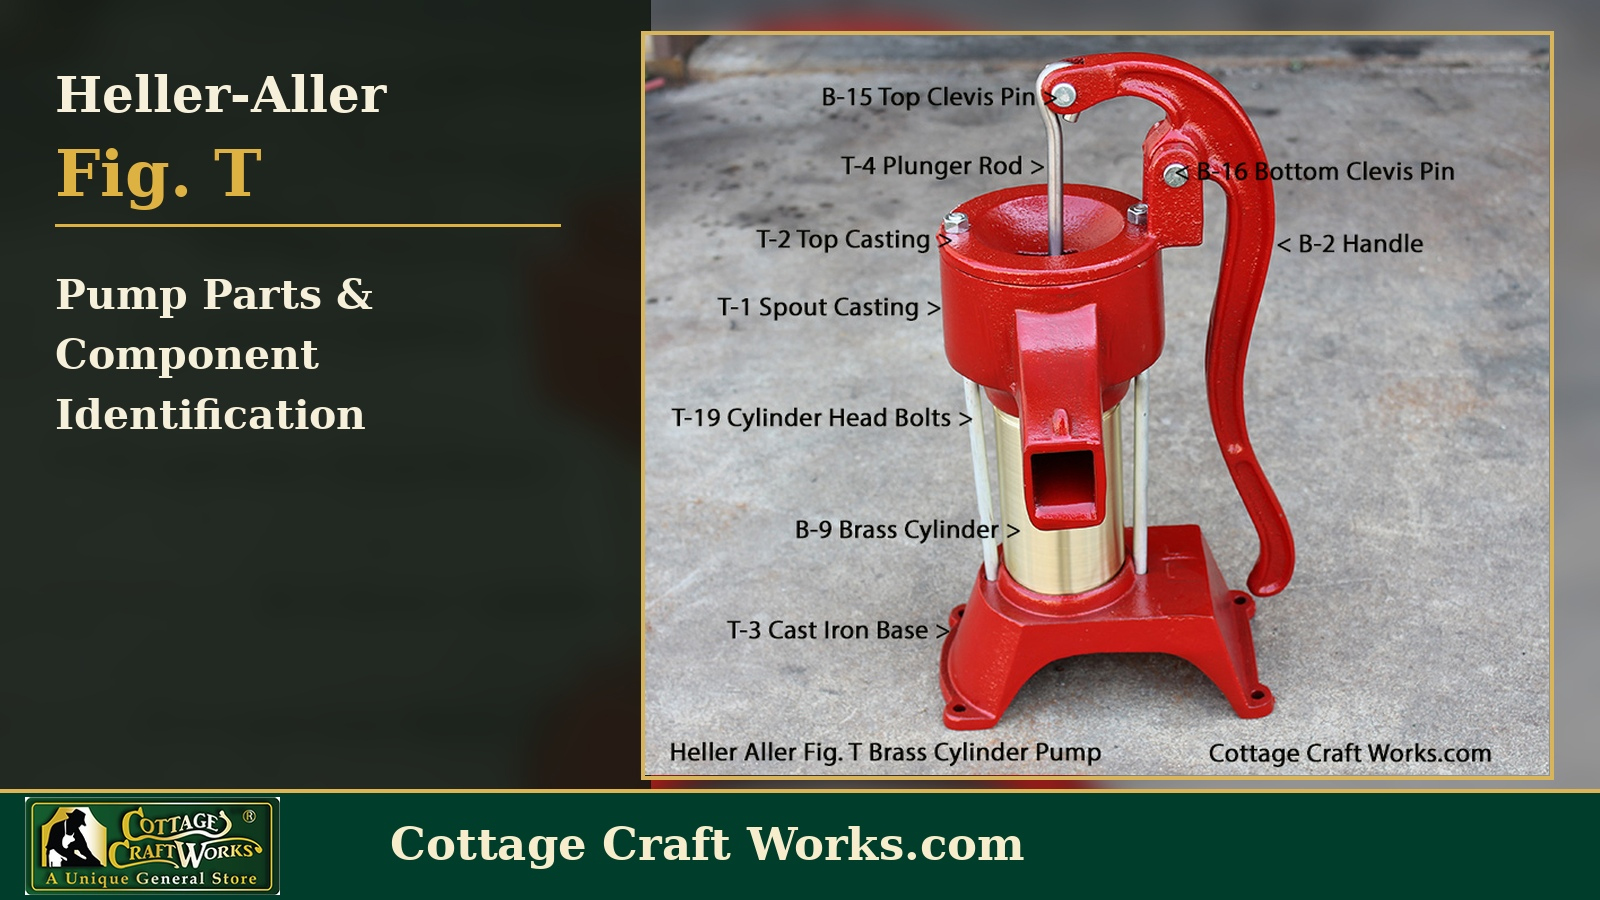
Heller Aller Fig T Pump Parts Labled